In today's fast-paced software development landscape, test automation plays a pivotal role in ensuring the quality and reliability of applications. Automated testing not only accelerates the testing process but also enhances test coverage and reduces manual effort. One of the most popular automation tools for web testing is Selenium, which empowers QA professionals to perform automated tests seamlessly and efficiently. In this blog post, we will explore the basics of Selenium and I will take you through a step-by-step setup to kickstart your web test automation journey.
Benefits of Test Automation:
Before we dive into the details, let's understand why test automation is indispensable in the modern QA world. Test automation offers a myriad of benefits, including:
Faster Test Execution: Automated tests can run significantly faster than manual tests, enabling quicker feedback on application changes and bug fixes.
Improved Test Coverage: With automation, you can cover more test scenarios and run extensive regression tests without the constraints of manual testing.
Reduced Manual Effort: Automating repetitive tasks frees up QA professionals to focus on more critical aspects of testing, such as test planning and analysis.
Step-by-Step Setup:
Let's get started with setting up Selenium WebDriver with ChromeDriver. Follow these steps:
Download ChromeDriver: Visit the official ChromeDriver website (https://chromedriver.chromium.org/downloads) to download the appropriate version of ChromeDriver for your operating system.
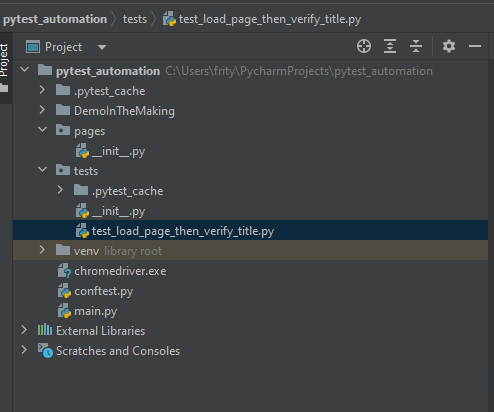
Place ChromeDriver in the Project: After downloading ChromeDriver, place the executable file in your project directory.
Import Required Libraries: Import the necessary libraries, including 'pytest' and 'selenium.webdriver.'
Webdriver Options:
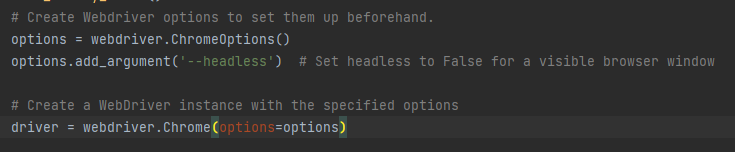
To harness the full potential of Selenium WebDriver, it's crucial to set up WebDriver options beforehand. WebDriver options allow you to customize the test environment according to your needs. For instance, you can configure options like running the test in headless mode (without a visible browser window) or disabling the sandbox to enhance test execution performance.
These options are command-line arguments that can be used with the ChromeDriver to configure its behavior and settings. Let's go through few of them:
`--headless`: This option runs the Chrome browser in headless mode, which means the browser will run without a visible GUI window. It is useful for running tests in the background without any UI interference. Instead of seeing the browser window, you can view the output and logs of the test execution (also in most cases default way your tests will be run on a pipeline).
`--disable-gpu`: Disables the GPU (Graphics Processing Unit) acceleration. This option can be used in headless mode to improve performance and prevent graphical glitches.
`--window-size=1920,1200`: Sets the initial window size of the browser. In this example, the browser window will have a width of 1920 pixels and a height of 1200 pixels. You can adjust these values based on your specific testing needs.
`--ignore-certificate-errors`: Ignores certificate-related errors. This can be helpful when testing websites with invalid or self-signed SSL certificates, as it allows the tests to proceed without interruptions.
`--disable-extensions`: Disables browser extensions. This option can be used to ensure that no extensions interfere with the test execution.
`--no-sandbox`: Disables the sandbox for the Chrome process. The sandbox provides an additional layer of security, but in some environments, it can cause issues with test execution. Using this option is generally safe for testing purposes.
`--disable-dev-shm-usage`: Disables the use of `/dev/shm` for temporary data storage. This option is useful for preventing potential issues related to shared memory usage in some environments.
When working with Selenium and ChromeDriver, using these options can help customize the browser's behavior to suit your testing needs and ensure a smooth and efficient testing experience. Keep in mind that some options may not be necessary for all test scenarios, so you can choose the ones that are most relevant for your specific use case.
Create the test:
The key is to choose a naming convention that suits your team's workflow and makes the purpose of each test clear. Consistency in naming across the project is essential to avoid confusion and ensure uniformity in your test suite. Whatever convention you choose, remember to use descriptive names that convey the intent of each test.
Choosing the Browser:
Selenium WebDriver is compatible with multiple browsers, not just Chrome. You can easily switch between browsers by changing the 'chrome' parameter in the code to 'firefox,' 'edge,' or others. This flexibility allows you to execute the same test suite across different browsers effortlessly. In my example I will be using chrome as one of most popular browsers. (side note :browsers like for example Brave are chromium based. Chromium is not Chrome though).
Simply place driver in root of our project.
Open a Web Page:
To interact with a web page using Selenium WebDriver, you need to instantiate a WebDriver instance for the desired browser and use its 'get' method to open the URL of the web page you want to test. This simulates a user's interaction with the website, allowing you to perform various actions like clicking buttons, filling forms, and more.
Below snippet is available for copy below

Write First Test
Now that we have set up Selenium WebDriver with ChromeDriver and learned about WebDriver options, it's time to write our first test using Pytest. Before diving into the test code, let's briefly discuss the importance of naming conventions and why clear and precise test names are crucial for the maintainability and readability of your test suite.
The Importance of Naming Conventions
Consistency in naming conventions is a vital aspect of writing maintainable and organized test code. A well-defined naming convention helps in easily identifying the purpose and scope of each test, especially when your test suite grows over time. It also ensures that all team members follow a standard practice, reducing confusion and making collaboration smoother.
Pytest Naming Convention
Pytest follows a simple yet powerful naming convention for test functions. According to Pytest's conventions, test functions should start with the prefix "test_". This prefix tells Pytest that the function is a test and should be executed when running the test suite.
For example, if you're testing the functionality of loading a web page and verifying the page title, a suitable test function name would be test_load_page_and_verify_title.
Be Precise and Avoid Vague Names
While writing test names, strive for precision and avoid vague names that don't clearly convey the test's intent. A well-named test should provide insights into the specific functionality being tested and the expected behavior. For instance, instead of naming a test "Test1" or "VerifyPage," consider a more descriptive name like test_login_successful_with_valid_credentials.
Write the First Test
With our naming conventions in mind, let's write our first test using Pytest. In the following example,Ie'll create a simple test then reactor it to utilise pytest. Aim of the test is to verify that a web page loads successfully and that its title matches the expected value.
Following the separation of concerns principle I will refactor the code below a bit.
def test_verify_title():

    options = webdriver.ChromeOptions()
    options.add_argument('--headless')
    driver = webdriver.Chrome(options=options)
    driver.get('https://www.example.com')
    assert "Example Domain" in driver.title
    driver.quit()
In the context of test automation, separation of concerns means organizing test code and test logic into separate components, ensuring that each test case focuses on specific functionalities or features of the application. This practice makes it easier to manage and update tests independently, improves code readability, and allows for better collaboration among team members.
By applying separation of concerns in test automation, teams can achieve a more modular and structured test suite, enhancing overall test maintenance and reducing the risk of cascading failures when making changes to the application or test suite. So applying separation of concerns into practice and setting up pytest fixtures to work it should look something like this:
@pytest.fixture # Pytest fixture to set up the WebDriver instance
def driver():
options = webdriver.ChromeOptions()
options.add_argument('--headless') # Run the test in headless mode
# Create a WebDriver instance
driver = webdriver.Chrome(options=options)
yield driver # this is crucial! forget about it and you will spawn countless browser instances
driver.quit()
# Test function to verify page load and title
def test_page_load_and_title(driver):
# Open the web page you want to test
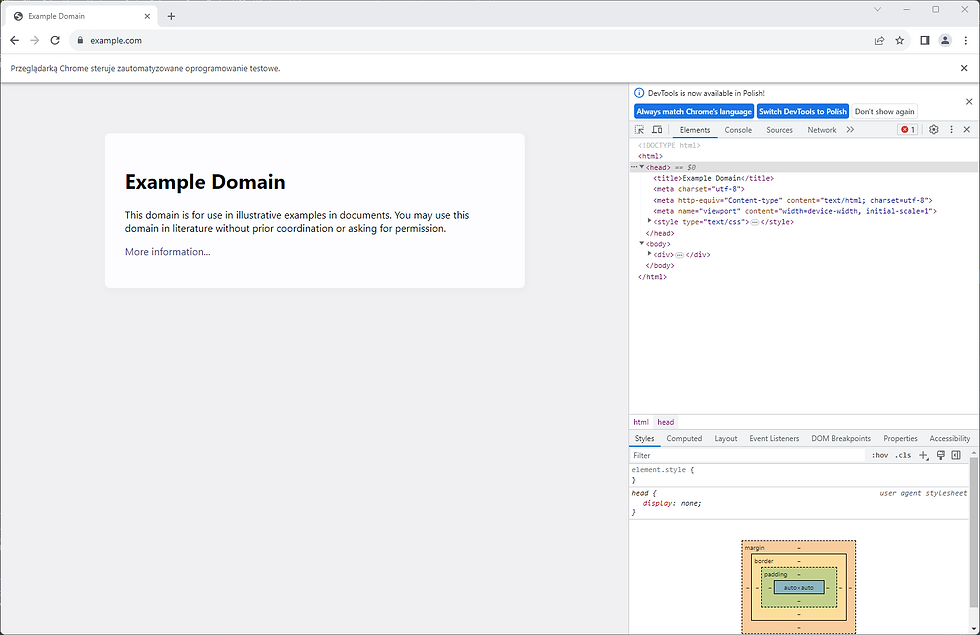
driver.get("https://www.example.com")
# Verify the title of the web page
assert "Example Domain" in driver.title
Assertion:
Assertions are vital in test automation as they help validate expected results against actual outcomes. After performing actions on the web page, you can use assertions to verify that specific elements, text, or functionalities behave as expected. Assertions play a crucial role in determining whether a test has passed or failed.
Debugging:
In the world of automation, debugging is a valuable skill. You can use debug statements in your test code to inspect the execution process, track variables, and identify potential issues. Debugging aids in diagnosing test failures and improving the overall robustness of your test suite.
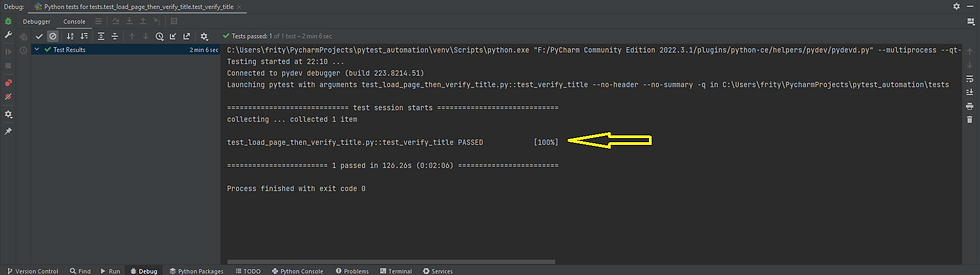
Test Execution:
Managing test execution is vital for an efficient testing process. Once a test is complete, it's essential to ensure proper cleanup of resources. In our case, we need to close the browser after the test using the 'driver.quit()' method to avoid resource leaks and optimize test performance.
Conclusion:
Sorry for the lengthy blog post I tried to be more concise but there is lots of material to cover. However, we explored the significance of test automation and how Selenium can empower QA professionals to perform web test automation seamlessly.
Setting up Selenium WebDriver with ChromeDriver is the initial step towards building a well-structured test suite. By understanding WebDriver options, selecting the browser, and learning about assertions and debugging, you're equipped to write efficient and reliable automated tests. Test automation is a powerful tool that paves the way for more complex and comprehensive test scenarios, improving the overall quality of your software testing efforts.
Happy testing!
Comments